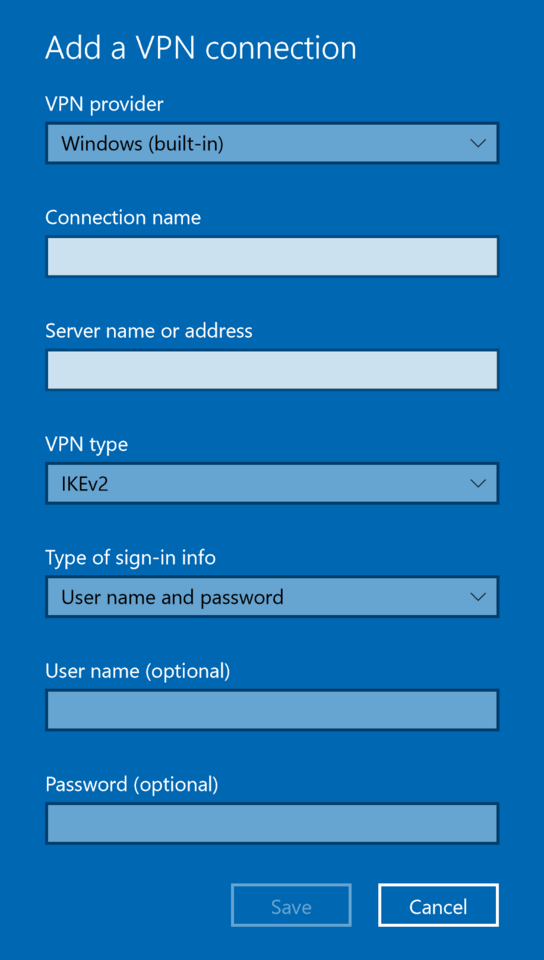
There’s no need to install a third-party Virtual Private Network (VPN) client in Windows 10 as the operating system already supports open standard VPN solutions like IKEv2. However, bugs in the Settings app in Windows 10 make it difficult to login to and access remote VPN services. Here is how you work the broken Settings app and setup a secure and working IKEv2 VPN profile.
More and more general-purpose VPN service providers are adding IPsec/IKEv2 to the list of protocols they support. The protocol is an open standard and it’s supported natively in iOS, MacOS, and Windows, and has partial (non-EAP authentication only) support in Android.
IKEv2 supports several forms of authentication without the need for the dubious practice of installing a root certificate provided by the VPN service provider. The Extensible Authentication Protocol (EAP; specifically EAP-MSCHAPv2) allows customers to authenticate with their account- or a device-specific username and password instead of certificates issued by the VPN provider.

Having to click the Save button in the Add a VPN connection dialog a second time to close the dialog is a sure sign that things aren’t working as expected.
Windows 10 does support the use of EAP authentication, but the ability for creating a VPN profile with this authentication method from the Settings app hasn’t worked since at least Windows 10 version 1607 (“Anniversary Update.”)
You can fill in the authentication information in the Add VPN connection dialog for creating a new VPN profile. However, it won’t be saved when you click the Save button. Clicking Save a second time dismisses the dialog but without saving any authentication information or the account credentials. The authentication information can’t be corrected from within the Settings app.
Creating a working IKEv2 VPN profile with PowerShell
Until Microsoft decides to fix the Settings app, you can still add a working IKEv2 VPN profile through PowerShell. You don’t even need to be an administrative user to add it. Note that PowerShell or the ability to add VPN profiles may have been disabled by Group Policy settings.
The setup instructions are quite simple:
- Adjust the
-Nameparameter to your choosing and set the-ServerNameto the VPN server address you’ve been given by your VPN service provider. - Open PowerShell from the Windows Start menu.
- Copy and paste the command into PowerShell, and press Enter to execute it.
Add-VpnConnection `
  -Name "Example VPN (Denmark)" `
  -ServerAddress "dk.vpn.example.net" `
  -AuthenticationMethod "Eap" `
  -EncryptionLevel "Maximum" `
  -RememberCredential `
  -TunnelType "Ikev2"
You can optionally remove the whole line containing the -RememberPassword parameter if you don’t want to save your VPN username and password in Windows. You’ll be required to re-enter your credentials every time you connect to the VPN if you remove this option.
Lastly, you should login and (optionally save) your VPN credentials to make sure that the connection is working.
- Open the Settings app and go to Network and Internet: VPN, and select the new VPN profile you’ve just created.
- Click Connect, and enter your VPN username and password when prompted.
You can also connect through the Network status icon in the taskbar. In my experience, this can be a bit buggy and will occasionally fail to remember your VPN credential the first time you connect to the VPN. The Settings app seems to get this part right, however. (Windows 10 has some serious software quality issues … .)
You should always test to verify that your VPN connection is encrypting all your network traffic.
Plugging the DNS leak
While the IKEv2 protocols allow for clients to be automatically configured to route all DNS requests to a specific DNS server through the VPN, … you don’t know whether that’s happening or not. There’s no indicator in Windows to check this, and you’d have to resort to manually inspecting network traffic to test it.
You should setup the DNS configuration manually to reduce the risk of domain queries leaking outside the VPN connection.
Unfortunately, the PowerShell cmdlets for configuring this are entirely broken and it can’t be configured from the Settings app either. (Seriously — what is up with all the bugs in Windows 10?) You’ll have to go into the legacy Control Panel to set the DNS configuration for your VPN profile from there.
- Open the Control Panel and go to Network and Internet: Network Connections.
- Select your VPN connection, right-click, and choose Properties.
- Switch to the Networking tab, and select IPv4.
- Click Use the following DNS server address, and enter the IPv4 address you’ve been given from your VPN provider or enter 9.9.9.9.
- Click OK, and repeat steps three–five for IPv6, but enter
2620:fe::fe.
The DNS server addresses used above belong to Quad9, a security and privacy-enhanced free-to-use public DNS service provider. You can configure any DNS service provider here except for your local router or the one offered by your Internet Service Provider (ISP).
This isn’t guaranteed to stop DNS leaks, but it does reduce the risk of DNS request leaks. You can significantly reduce the risk by investing in a dedicated VPN gateway router (like the Vilfo) and connecting your computer and devices exclusively through that device.
