Windows Setup, the Windows installation tool, unfortunately, doesn’t provide any graphical tools for shrinking or expanding a UEFI System Partition (ESP; sometimes EFISYS).
You can still create a custom-sized ESP by side-stepping out of Windows Setup and into the Command Line for a minute to partition the disk to your liking. I’ll walk you through the process in this tutorial.
This tutorial assumes you’re working with an empty disk, and that your computer is UEFI compliant. You may need to delete any existing partitions on the drive before proceeding. You can’t rely on this tutorial to grow the UEFI System Partition (ESP) on an existing installation as any attempt would be blocked by your existing partition boundaries.
Windows won’t let you recreate a UEFI system outside the Windows Setup installation program. You should follow this tutorial during the initial Windows installation process with Windows Setup.
So, you’ve booted up into Windows Setup from your installation media, and you’ve selected to perform a Custom installation. Whether you’re planning to and preparing to dual-boot with Linux or just want to provide a larger margin of error; you may have noticed that the default 105-or-273 MB (100-or-260 MiB) partition for the UEFI System Partition is a tad small. (The default ESP size depends on your disks physical sector size.)
You need to decide what size you want your UEFI System Partition to be before you begin. You can take a pause here to read How large should you make your UEFI System Partition? before you proceed as it will be quite challenging to attempt to change the size you allocate to your ESP after you’ve installed the system without reinstalling.
Once you’ve decided on the appropriate size for your computer and needs, then you can follow these steps to proceed. The tutorial begins from the first step of the Custom installation screen in Windows Setup (screenshot of this screen at the end of the article):
- Select your installation target and make sure it has no partitions (except unallocated space)
- Click the New and then the Apply button.
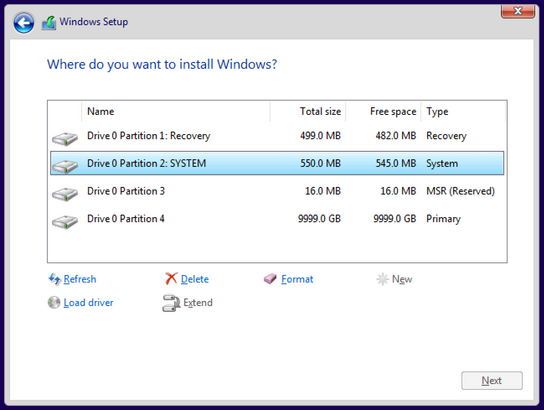
You should now have four partitions: Recovery, System (ESP), MSR, and Primary.
- Select each of the System, MSR, and Primary partitions in turn and click the Delete button to delete these partitions. Leave the Recovery partition in place.
- Press Shift + F10 to open the Command Prompt
- Type diskpart.exe and press Enter to open the disk partitioning tool
- Type list disk and press Enter to list out your disks
- Type select disk n where n is the number for the disk you want to install to as identified by the above command and press Enter
- Type create partition efi size=550 where 550 is the desired size of the ESP in Mebibytes (MiB), and press Enter
- Type format quick fs=fat32 label=System and press Enter to format the ESP
- Type exit and press Enter to exit the disk partitioning tool
- Type exit and press Enter again to exit the Command Prompt
You should now be back in the graphical Windows Setup partitioning tool where nothing has changed since the last time you looked at it.
- Click the Refresh button to detect your partition changes
You should now have a disk with a default Windows Recovery tools partition, a 500 MiB UEFI System Partition, and some unallocated space for your Windows installation.
- Select the unallocated space from the disk list and click the New button to automatically recreate the MSR and System partition in the remaining space
The final result should look something like this:

That should be all. From here, you can continue with your Windows installation as normal. If you should run into problems with the system not booting after completing this tutorial, then please refer to your systems manufacturer documentation for any special hardware requirements. Look for references to UEFI boot and the UEFI System Partition in particular.
Some older hardware models required non-standard FAT16-formatted ESPs, or had special partitioning size requirements. You should be able to adjust the steps in the tutorial to accommodate such requirements.
