Have you just installed Windows 10 Creator’s Update and realized that Microsoft has removed all the controls for disabling its Cortana online-assistant service? Fear not for your privacy nor your autonomy over your Windows PC! You can still disable Cortana and restore Windows Search on the taskbar and in the Start menu. All it takes is a tiny tweak to the Windows Registry.
Microsoft wants you to use Cortana, and by extension their Bing web search service. There are vast riches to be made by being a dominant search engine — just ask Google! — and Microsoft want to increase their share of the market. To that end, Cortana is now aggressively pushed by Windows in the latest feature update to Windows 10, colloquially known as the “Creator’s Update”. The installation wizard wants you to turn it on, the upgrade assistant wants you to turn it on, “helpful hints” push you to do the same, and it’s quite easy to turn it on by accident later on.
Some users may not want everything they type in to their Start menu to be sent to Microsoft’s servers and may prefer the good old days when their Windows PCs managed to perform local-device searches without “enhancing” the search results by adding ads from the Windows Store and Groove Music Store.
Here is how you revert back to on-device Windows Search and disable Cortana:
- Open up the Registry Editor by searching for “regedit” in search field at the bottom of the screen. This will be the last time you use Cortana before waving her goodbye.
- Click at the location bar, right underneath the toolbar, type in the following, and press Enter: Computer\HKEY_LOCAL_MACHINE\SOFTWARE\Policies\Microsoft\Windows
- From the toolbar, go to Edit: New: Key. You should see a blue border and a blinking cursor indicating a text input field to the left in the window; in the folder tree underneath the Windows folder.
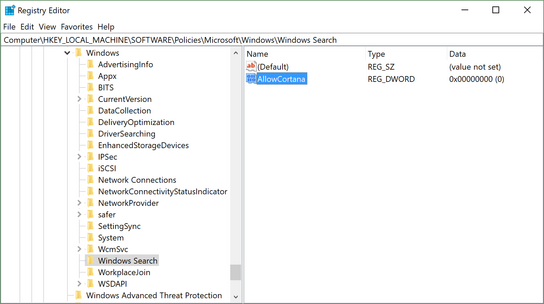
- Type in “Windows Search” in the selected field and press Enter to confirm.
- From the toolbar, go to Edit: New: DWORD (32-bit) Value. You should see a blue border and a blinking cursor indicating a text input field to the right in the window.
- Type in “AllowCortana” to this field and press Enter. Leave the key’s default value (0) as-is.
- Reboot your Windows device.
For reference, the end result in the Registry editor should look like the below screenshot:

If you ever change your mind in the future, you can delete the AllowCortana key from the registry. From the toolbar, go to Favorites: Add to Favorites to make it easier to find your way back to this registry key in the future.
I think it’s an unfortunate situations that it’s so easy to enable Cortana in Windows 10, and frustrating that Microsoft has made it near impossible for regular users to disable the feature again. There’s no good reason why users shouldn’t be able to easily turn the feature off again if they’re uncomfortable with it or just plain don’t like it.
It’s also possible for Windows 10 Enterprise and Professional users to disable Cortana using a Group Policy. However, this option isn’t available to Windows 10 Home users. The System Registry method outlined above works for disabling Cortana in all Windows 10 variants.
If you’re concerned about the privacy implications of using Cortana or even Windows Search, you can consider using another desktop search program altogether. I prefer FileLocator to just about any other search program available on Windows 10. It’s entirely offline and can do deep-searches across all your files and file types without needing to transmit any data to a server somewhere on the internet. Why don’t you give it a try?
